Introduction
This page is broken down into 4 main chapters
- A chapter to define the different concepts and concept of white label.
- A chapter showing how to simply configure some white-label elements online.
- A chapter describing the creation of custom stylesheets and their applications to Payline interfaces
- A chapter describing the procedure for setting up a personalized image
This page supplements the Payline Administration Center User Manual, the Advanced Personalization Guide for Payment Web Pages, and the TPEV Customization Guide.
The white label, notions
Payline offers its distributors to white label the various interfaces for end users (merchants or buyers). These interfaces are:
- The administration center
- Payment web pages
- The virtual payment termin al
The customization in white label allows to give the applications a proper identity. This customization can be done by 3 means:
- Creating specific URLs for accessing applications (see Creating specific URLs).
- Changing logos (see section Customizing applications by the Administration Center)
- Implementation of personalized style sheets (CSS) (see Customization of the CSS of the administration center and Personalization of the CSS of the payment web pages and Personalization of the CSS of the TPEV)
- Custom Image Usage (see How to Customize Application Images)
- Configuring sent emails (see Customizing the Administration Center and Customizing Payment Web Pages)
Creating specific URLs
URLs to access services
White labeling Payline applications requires the creation of custom URLs. These URLs are 3 * 2 (3 for production and 3 for registration) to access the following sites:
- Payline Administration Center
- Payment web pages
- TPEV
Payline web services not being visible to end users, is not customizable.
Certificat SSL
Payline provides secure communication between its customers (merchants or buyers) and servers. This is achieved by strong encryption of SSL V3 data exchange.
This encryption is provided by SSL certificates installed on Payline servers.
The generation of these certificates is provided by Monext. The data needed to create the certificates are:
- Certificate Creation Delegation (Appendix 1)
- URLs of each application
| The delegation of certificates creation is provided in Appendix 1 and must be returned by fax to 04 42 25 14 12 or scanned and sent signed by email to assistance@payline.com . |
The cost of setting up the certificates is available on request from the sales department.
Customization of the graphic charts
All chart changes are relative to the U RLs provided to access the services. These URLs are therefore mandatory and must be defined first.
| The DNS resolution of the URLs must be set up by the Payline solution's distributor. |
Customization of applications by the Administration Center
Payline offers customizations of different applications in a very simple and dynamic way on the screens of the administration center.
The customization is available from the menu "Configuration My Account"
Distributor Account Management Screen
This screen is used to view the interface and options available for the distributor account. These options may be offered through commercial offers to merchants (see Business Offer Management).
It also allows you to configure simple items in your distributor account.
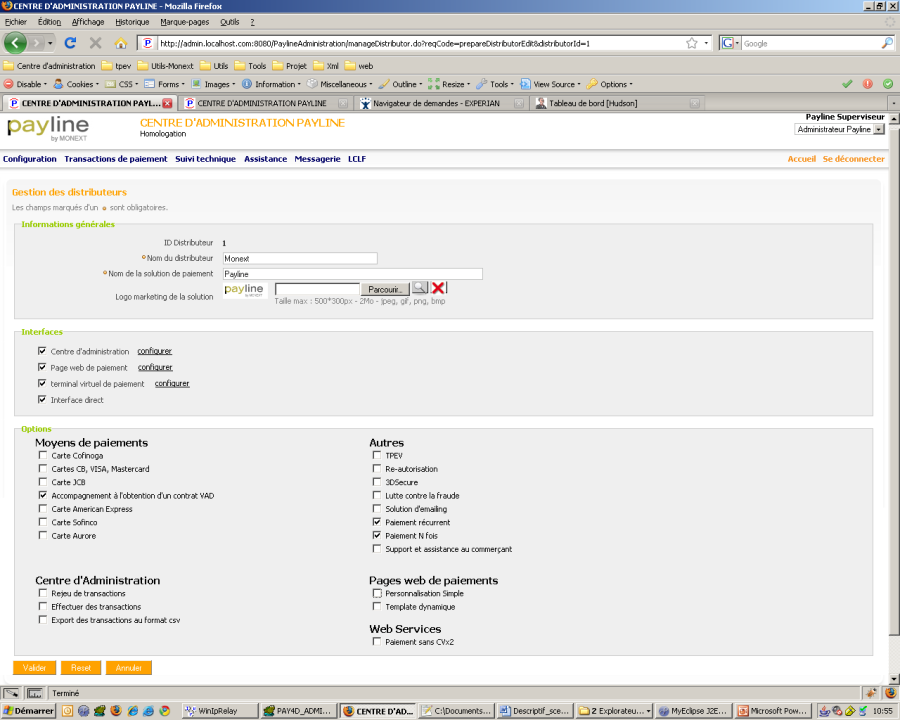
A first grouping of fields makes it possible to inform the general information of the distributor.
Distributor ID
This field is generated automatically by Payline. It is the unique identifier of the distributor.
It is used to communicate with the customer management as well as to reconcile the merchants attached to this distributor. |
Distributor Name
This is the distributor's business name.
This name only has an informative role and is not displayed in the screens. |
Payment Solution Name
This is the business name of the payment solution.
This name only has an informative role and is not displayed in the screens. |
Solution Marketing Logo
This is the commercial logo of the payment solution.
This logo has only an informative role and is not displayed in the screens. |
A second grouping of fields makes it possible to visualize the available interfaces as well as to configure (if necessary) the different elements of white mark of each interface.
The activation of the interfaces is possible via the commercial contact.
Administration Center
This check box shows whether or not the distributor can offer this interface to its merchants.
If the box is checked (the administration center is available) then a configure link is used to set the white-label elements of the administration center (see section Customizing the Administration Center
for the details of this configuration). |
Payment web pages
This check box shows whether or not the retailer can offer this interface to its merchants.
If the box is checked (the payment web pages are available) then a configure link is used to set the white label elements of the payment web pages (see section Customizing payment web pages for the details of this configuration). |
Virtual payment terminal
This check box shows whether or not the retailer can offer this interface to its merchants.
If the box is checked (the virtual payment payment terminal is available) then a configure link is used to set the white-label elements of the payment virtual payment terminal (see section Customizing the TPEV for the details of this configuration). |
Direct interface
This check box shows whether or not the retailer can offer this interface to its merchants.
This interface does not require a white label configuration. |
A third grouping of fields makes it possible to visualize the available options.
Activation of the options is possible via the sales contact.
The options are grouped by types and interfaces. The complete list of options and their description is available from the sales department.
Customizing the Administration Center
This page allows the customization of the administration center.
An image of the Administration Center is on the right side of the screen and shows where the area is currently being modified.
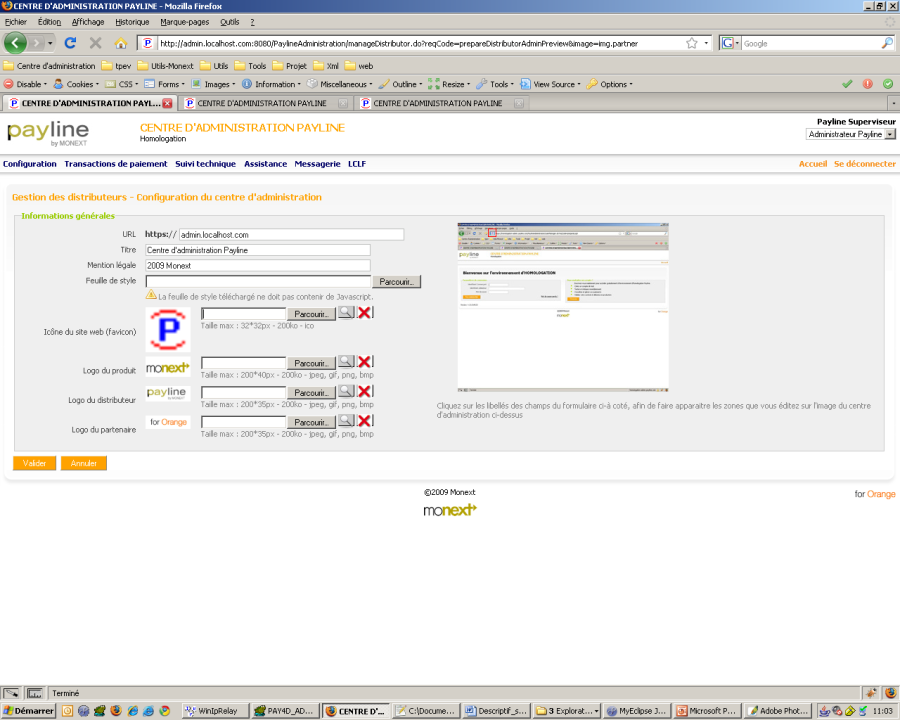
URL
This field is used to define the URL that will be used to access the Payline site. This URL must be secure. |
Title
This is the title of the application. This title appears in the browser window. |
Legal
notice This zone allows you to enter a legal notice that appears at the bottom of the site. |
Style Sheet
This area allows you to download a custom style sheet. The Customizing CSS section of the Administration Center describes how to create these style sheets. |
Website Icon
This is the icon that appears in the title or address bar of the browser. Its size is 32 * 32 pixels and its format must be .ico |
Product Logo
This is the product logo displayed on the top left of the site. Its size is 200 * 40 pixels and its format must be jpeg, png or bmp. |
Distributor Logo
This is the product logo displayed at the bottom center of the site. Its size is 200 * 35 pixels and its format must be jpeg, png or bmp. |
Partner Logo
This is the product logo displayed at the bottom right of the site. Its size is 200 * 35 pixels and its format must be jpeg, png or bmp. |
Validate
This button is used to save the changes and return to the distributor's management page. |
Cancel
This button cancels the changes and returns to the distributor's management page. |
Customization of payment web pages
This screen allows you to customize payment web pages as well as create email templates sent during payments.
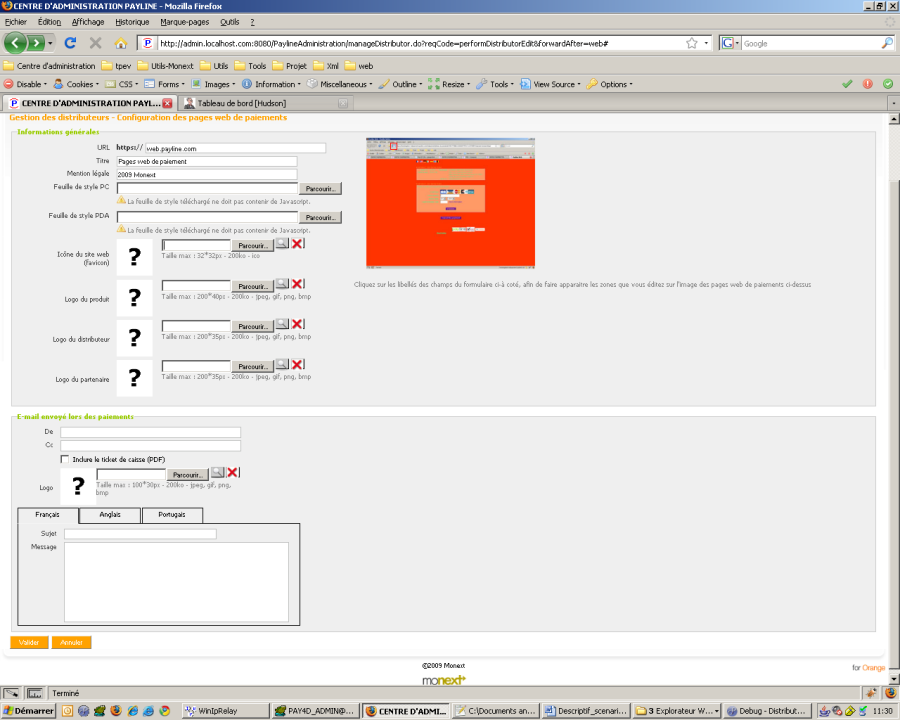
A first block allows the entry of personalization data on payment web pages:
URL
This field is used to define the URL that will be used to access the Payline site. This URL must be secure. |
Title
This is the title of the application. This title appears in the browser window. |
Legal
notice This zone allows you to enter a legal notice that appears at the bottom of the site. |
PC Style Sheet
This area allows you to download a custom style sheet that will be used on a PC. The Customizing CSS section of the payment web pages describes the creation of these style sheets. |
PDA style sheet
This area allows you to download a custom style sheet that will be used on mobile equipment. The Customizing CSS section of the payment web pages describes the creation of these style sheets. |
Website Icon
This is the icon that appears in the title or address bar of the browser. Its size is 32 * 32 pixels and its format must be .ico |
Product Logo
This is the product logo displayed on the top left of the site. Its size is 200 * 40 pixels and its format must be jpeg, png or bmp. |
Distributor Logo
This is the product logo displayed at the bottom center of the site. Its size is 200 * 35 pixels and its format must be jpeg, png or bmp. |
Partner Logo
This is the product logo displayed at the bottom right of the site. Its size is 200 * 35 pixels and its format must be jpeg, png or bmp. |
A second block allows the customization of emails:
Language
| This drop-down list allows you to choose a language for sending emails. The language that appears with a star is the default language (if the language of the buyer does not exist on Payline, then he will receive an email in this language).
Languages that appear in red are languages that have not yet been customized.
A change of choice in this list causes an update of the values entered as well as reloading of the page with the values for the selected language. |
|---|
Default language | This checkbox allows you to choose the default language. |
|---|
Of | This is the email address that sent the email. The format of this field is of the following form: name@domain.comor to put an alias "Payment Payline < name@domain.com >" |
|---|
Cc |
This zone allows the sending in hidden copy of the emails to one (or more) address data. The format of this field is in the following form: name@domain.com or to put an alias "Payment Payline < name@domain.com >". If the zone contains multiple addresses they must be separated by a semicolon |
|---|
Include cash receipt | This checkbox is defined if the receipt in PDF format is to be included as an attachment of the mail sent to the buyer |
|---|
Website icon | This is the icon that appears in the title or address bar of the browser. Its size is 32 * 32 pixels and its format must be .ico |
|---|
Logo | This is the logo of the inserted in the attachment in PDF as well as in the mail. Its size is 100 * 30 pixels and its format must be jpeg, gif, png or bmp. |
|---|
Topic | This is the subject of email. It can be set in the same way as the message content |
|---|
Message | This is the body of the message. It is possible to put html text and insert values in dynamic ways. The available variables are shown in the table on the right and must be inserted between "#" in the text |
|---|
Variable | Description |
|---|
| #buyer.firstname# | Customer's first name |
|---|
| #buyer.lastname# | The customer's name |
|---|
| #logoImage# | The logo of your company rendered in an image tag |
|---|
| #order.reference# | The reference of the order |
|---|
| #ticket.formattedAmount# | The paid amount formatted with the chosen currency |
|---|
| #pos.label# | Point of sale label |
|---|
Validate | This button saves the changes and returns to the distributor's management page |
|---|
Cancel | This button cancels the changes and returns to the distributor's management page |
|---|
Customization of the TPEV
Like the Administration Center, this page allows the customization of the TPEV.
A screenshot of the TPEV is present on the right side of the screen and shows where the area is currently being modified.
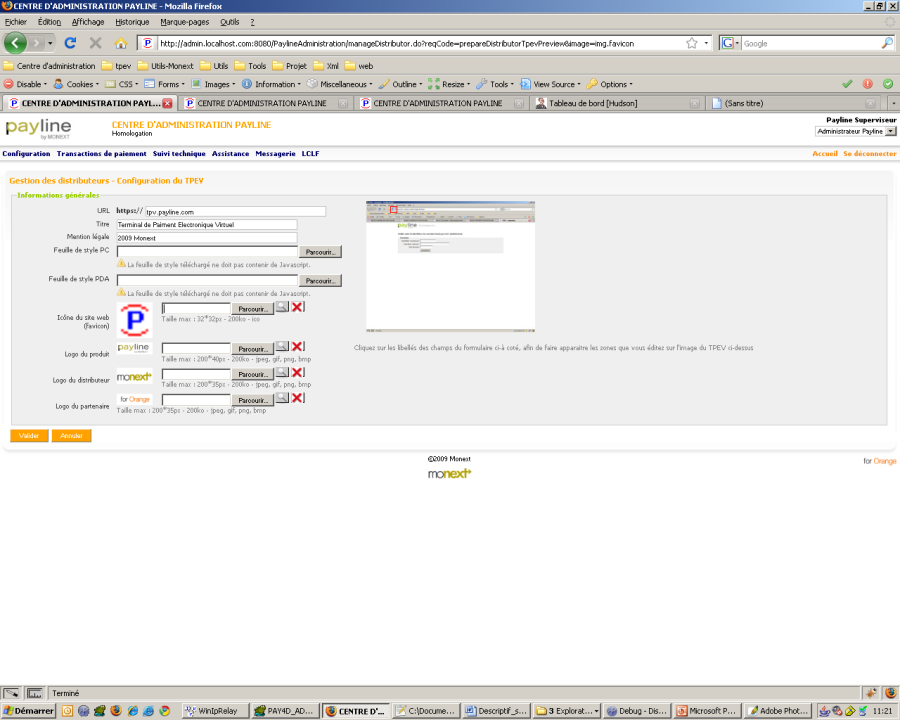
URL
This field is used to define the URL that will be used to access the Payline site. This URL must be secure. |
Title
This is the title of the application. This title appears in the browser window. |
Legal
notice This zone allows you to enter a legal notice that appears at the bottom of the site. |
PC Style Sheet
This area allows you to download a custom style sheet that will be used on a PC. The Customizing CSS section of the TPEV describes the creation of these style sheets. |
PDA style sheet
This area allows you to download a custom style sheet that will be used on mobile equipment. The Customizing CSS section of the TPEV describes the creation of these style sheets. |
Website Icon
This is the icon that appears in the title or address bar of the browser. Its size is 32 * 32 pixels and its format must be .ico |
Product Logo
This is the product logo displayed on the top left of the site. Its size is 200 * 40 pixels and its format must be jpeg, png or bmp. |
Distributor Logo
This is the product logo displayed at the bottom center of the site. Its size is 200 * 35 pixels and its format must be jpeg, png or bmp. |
Partner Logo
This is the product logo displayed at the bottom right of the site. Its size is 200 * 35 pixels and its format must be jpeg, png or bmp. |
Validate
This button is used to save the changes and return to the distributor's management page. |
Cancel
This button cancels the changes and returns to the distributor's management page. |
Management of commercial offers
This section shows how to create commercial offers for merchants. These offers are configurable and can be offered for a defined duration to merchants.
The commercial offers management screens are accessible via the menu "Configuration Management of commercial offers"
Options and accessible interfaces
The payment solution offers 4 payment interfaces and a large number of options. Access to these interfaces and options is defined by Payline support based on the contract signed with Monext.
Administration Center |
Payment web pages |
Virtual payment terminal |
WebService |
The complete list of options and their description is available from the sales department.
Business offers research
This screen allows the search for commercial offers according to certain criteria, it also allows to create a new offer (see Error! Source of the return not found. ).
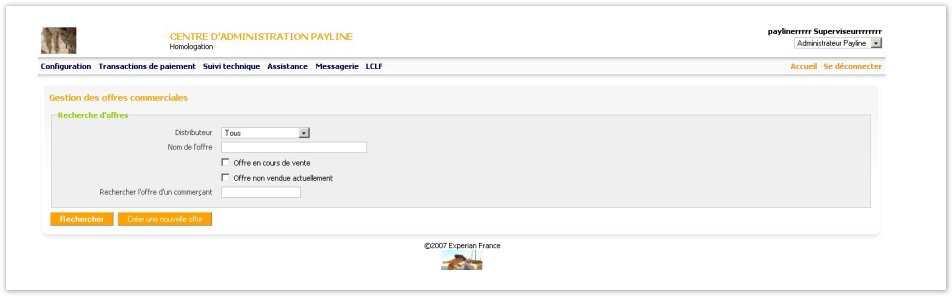
Offer name
This field is used to search for an offer by name. Only part of the name can be entered. |
Offer in the course of sale
This box makes it possible to limit the search to the offers currently sold |
Offer name sold now
This box allows you to search for offers that are no longer sold |
Find a merchant's offer
This field is used to search for the offer taken out by a merchant. You must enter here the merchant ID. |
Search
This button is used to start the search. See Table of commercial offers |
Create a new offer
This button is used to create a new offer. See Creating or Changing Business Offers for Merchants |
Table of commercial offers
This screen makes it possible to visualize the offers proposed to the traders, to go on their detail or to make a new copy.
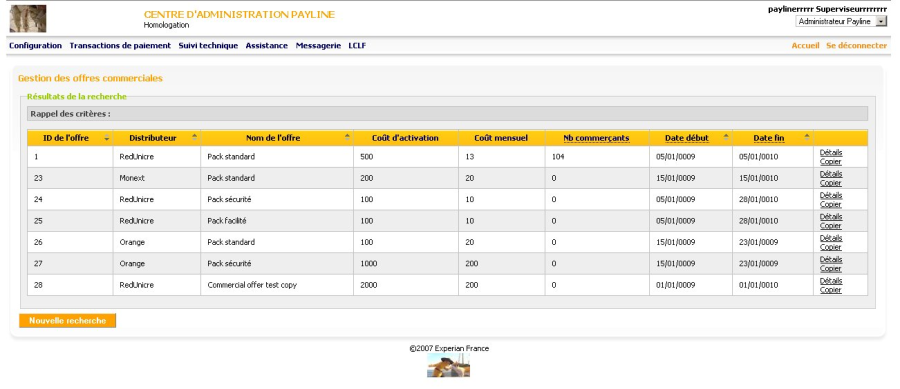
Offer ID
This field shows the unique ID of your offer. |
Offer name
This box shows the trade name of the offer (name displayed to traders) |
Activation
cost Cost in the currency of activation of the offer. |
Monthly
cost Cost in monthly currency of the offer |
Number of merchants The
number of merchants who have subscribed to this offer.
A link on the number of merchants makes it possible to display the table of merchants |
Start
date Start date of offer for sale |
End
date End date of offer for sale |
Details
View the details of an offer |
Copy
Create a new offer from an existing offer. |
This screen allows the modification or the creation of commercial offer. It allows the entry of the general information of the offer as well as the choice of options to be included in the offer.
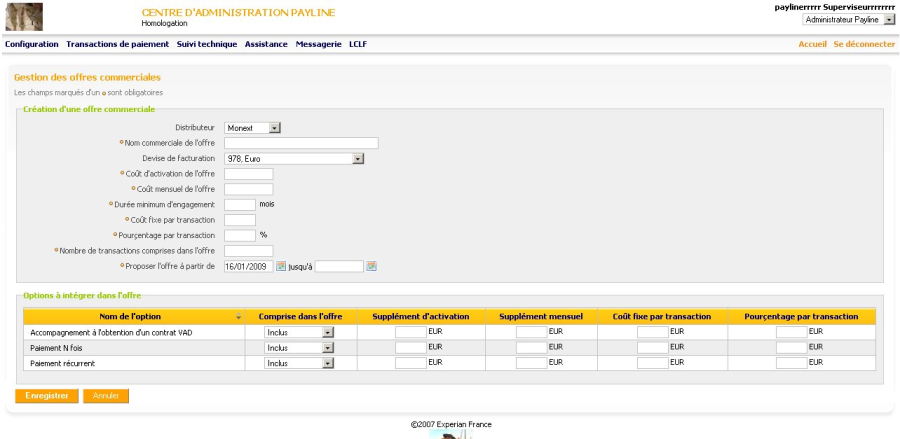
This screen is split into two parts, one for entering information about the offer:
Offer Business Name
This field is used to enter the business name of the offer. This name will be displayed to traders. |
Billing Currency
This drop-down list allows you to enter the billing currency |
Cost of activation of the offer
Cost in currency of activation of the offer. |
Monthly cost of the offer
Cost in the monthly currency of the offer |
Minimum duration of commitment
Minimum duration during which the merchant will not be able to break his subscription |
Fixed cost per transaction
Fixed cost in currency for each transaction. |
Percentage per transaction
Percentage taken for each transaction. |
Number of transactions included in the offer
Number of free transactions included in the offer |
Propose the offer from ... until ...
Start and end date of sale of the offer |
No longer sell this offer
Case check that no longer offers this offer for sale. |
The second for entering options to include in the offer.
Option
Name The name of the option. |
Included in the offer
This list allows you to choose whether to include, not to include or to make optional an option for this offer.
An offer not included will not be shown to merchants upon registration.
An included offer will be shown as free and included in their offer.
An optional offer can be chosen by a trader according to his needs |
Monthly supplement Monthly
surcharge in currency for this option. |
Fixed additional cost per transaction
Fixed currency supplement for all transactions made using this option. |
Additional Percentage Per Transaction The
additional percentage for each transaction using this option. |
Save
Save Changes / Create Offer |
Cancel
Cancel and return to the offer search screen |
Online registration of traders
When registering online, traders are offered offers that were created in the previous step.
Customizing the CSS of the Administration Center
This paragraph shows how to expertly customize CSS by the admin center.
The full CSS of the Administration Center is available at the following address:
https://homologation-admin.payline.com/PaylineAdministration/skins/default/all.css
General Styles
The general styles of the Payline app are explained in this section
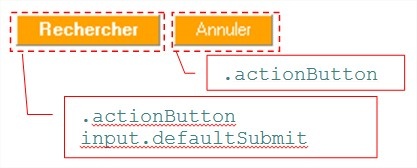
CSS example admin center |
/ *** Default button style *** /
input.defaultSubmit {
font-weight : bold ;
}
/ *** Style button *** /
.actionButton {
background-color : # FFA200 ;
border-width : 1px ;
color : #FFFFFF ;
padding : 0.15em 1em 0.2em ;
}
/ *** Global settings (font, background color) *** /
body {
font-family : Tahoma, sans-serif ;
font-size : 70% ;
margin: 0;
padding: 0;
} |
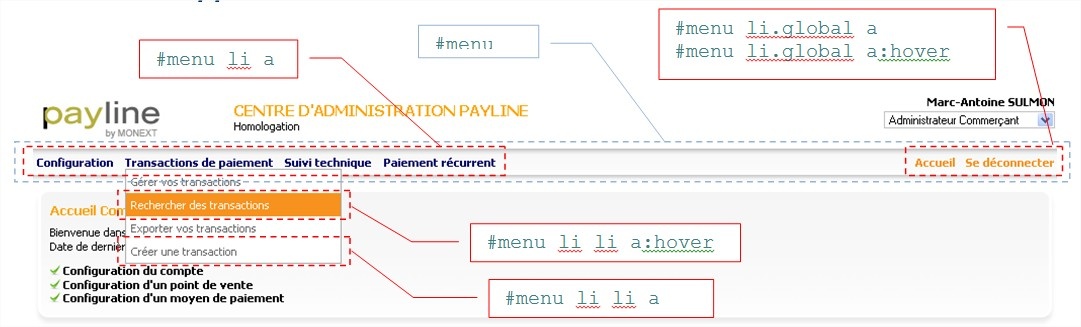
/*** Style des menus ***/
#menu li a {
color: #000066;
font-weight: bold;
line-height: 1.2em;
padding: 5px 0;
text-decoration: none;
}
/*** Style des sous menus ***/
#menu li li a {
background: #FFFFFF none repeat scroll 0 0;
color: #666666;
display: block;
font-weight: normal ;
line-height : normal ;
padding : 5px ;
text-decoration : none ;
width : 18em ;
}
/ *** Sub-menu style on a rollover by the mouse *** /
#menu li li: hover {
background : # F7921E none repeat scroll 0 0 ;
color : white ;
}
/ *** Link on the menu on a flyover by the mouse *** /
#menu li.global menu a: hover {
text-decoration: underline;
}
/*** Lien sur le menu ***/
#menu li.global a {
color: #F7921E;
}
/*** Fond du menu ***/
#menu {
background: transparent url(images/css/header_bg_2.gif) repeat-x scroll 0 0;
clear: both;
height: 35px;
line-height: normal;
padding-left: 5px;
position: relative;
top: 0;
z-index: 10;
}
|
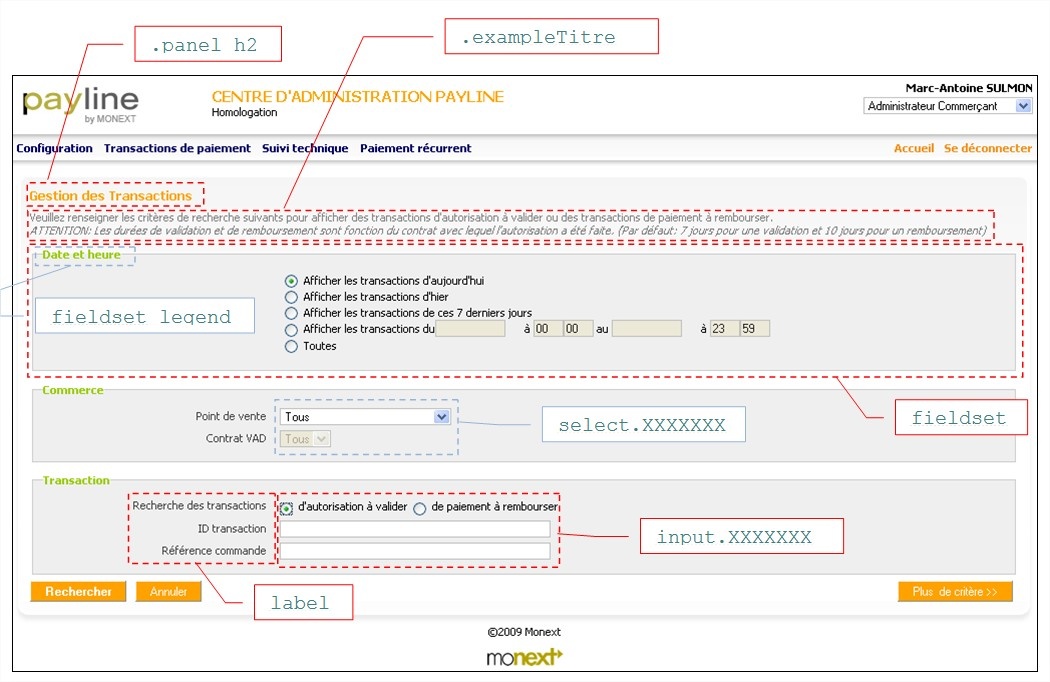
CSS example admin center |
/*** Titre de l'écran ***/
.panel h2 {
color: #FFA200;
font-size: 1.2em;
margin: 0 0 0.5em;
padding: 0;
}
/*** Aide ***/
.exampleTitre {
color: #808080;
margin-bottom: 0.5em;
}
/*** Panneau de champs ***/
fieldset {
background: #EFEFEF none repeat scroll 0 0;
border: 1px solid #CCCCCC;
display: block;
margin-bottom: 1em;
padding-bottom: 10px;
padding-left: 10px;
padding-right: 10px;
position: relative;
top: 5px;
}
/*** Titre du panneau de champs ***/
fieldset legend {
color:#99CC00;
font-weight: bold;
margin: 0;
padding: 0;
text-align: left;
vertical-align: middle;
}
label {
cursor: pointer;
}
/*** Format des champs saisissables ***/
input.formField,
input.formFieldRequired,
input.paylineField,
input.paylineFieldDate,
input.paylineFieldDateSmall,
input.paylineFieldDatePadding,
input.paylineFieldLong,
input.paylineFieldCard,
input.paylineFieldMiddle,
input.paylineFieldCheck,
input.formFieldLongest,
input.paylineFieldLongest,
input.paylineFieldSpecial {
border: 1pxsolid #BEBFBE;
color: #222222;
}
/*** Format des listes déroulantes ***/
select.formField,
select.formSelect,
select.paylineField,
select.paylineFieldGrey,
select.paylineFieldQualif,
select.paylineFieldLong {
border:1px solid #BEBFBE;
}
|
Table of results
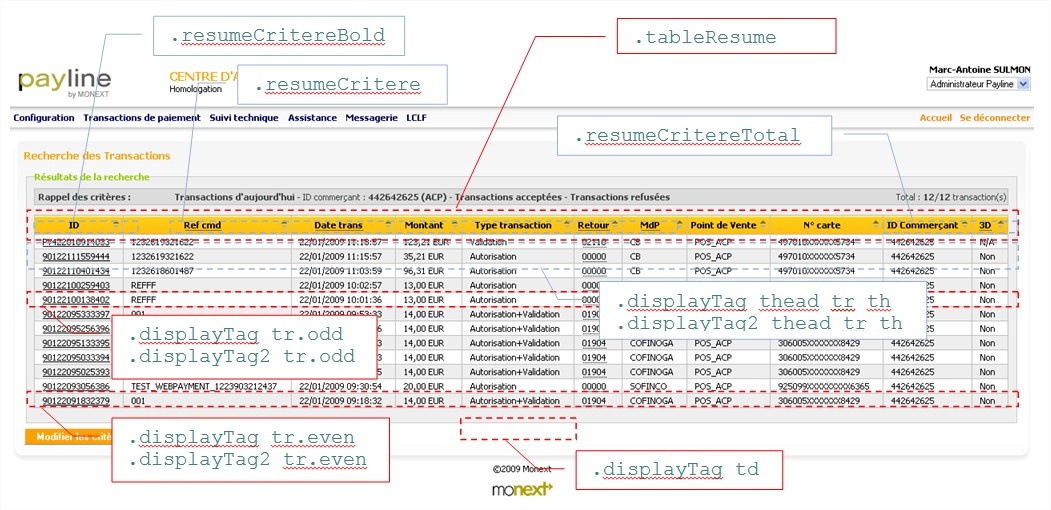
CSS example admin center |
/*** Zone de rappel des criteres ***/
.tableResume {
background: #EEDCDC none repeat scroll 0 50%;
border: 1px solid #C0C0C0;
border-collapse: collapse;
margin-bottom: 5px;
margin-top: 5px;
width: 100%;
}
/*** Rappel des criteres ***/
.resumeCritereBold {
color:#444444;
font-weight:bold;
height:20px;
width:14%;
}
/*** Résumé des criteres ***/
resumeCritere {
color:#EE4444;
height:20px;
text-align:left;
}
/*** Nombr d'element dans la liste ***/
.resumeCritereTotal {
color:#444444;
height:20px;
text-align:right;
width:20%;
}
/*** table header ***/
.displayTag thead tr th,.displayTag2 thead tr th {
background: transparent url(images/jaune.gif) repeat-x scroll left top;
border: 1px solid #BEBFBE;
color: #000066;
font-weight: bold;
padding: 5px;
text-align: center;
width: auto;
}
/*** odd line ***/
.displayTag tr.odd,.displayTag2 tr.odd {
background: #FFFFFF none repeat scroll 0 0;
border-top: 1px solid #C0C0C0;
color: #000000;
padding: 0;
}
/*** even line ***/
.displayTag tr.even,.displayTag2 tr.even {
background: #EEEEEE none repeat scroll 0 0;
border-top: 1px solid #C0C0C0;
color: #000000;
padding: 0;
}
/*** Table cells ***/
.displayTag td {
border: 1px solid #C0C0C0;
padding: 2px 15px 2px 10px;
} |
Error messages

CSS example admin center |
ul#pagemessages li.success {
background: transparent url(images/accept.gif) no-repeat scroll 0 0;
} |
Confirmation messages

CSS example admin center |
ul#pagemessages li.error {
background: transparent url(images/exclamation.gif) no-repeat scroll 0 0;
} |
Customization of the CSS of the payment web pages
This section shows the main CSS tags used to customize payment web pages.
These settings are the default visual for merchants. Merchants can also customize web pages via simple customization (see the Administration Center user manual) or via dynamic web page templates (see the advanced configuration guide for payment web pages).
The CSS complete web payment pages is available at:
https://homologation-webpayment.payline.com/webpayment/skin/default/all.css
Error and confirmation messages

CSS example of the payment web pages |
/ *** Message block *** /
#PaylineForm #agemessages {
}
/ *** Pictogram and wording of the error (eg: "Please
enter a valid card number") *** / #PaylineForm #pagemessages p.error {
}
#PaylineForm #pagemessages p.info {
}
#PaylineForm #pagemessages p.warn {
}
#PaylineForm #pagemessages p.success {
}
#PaylineForm #pagemessages p.confirm {
} |
Choice of payment method page
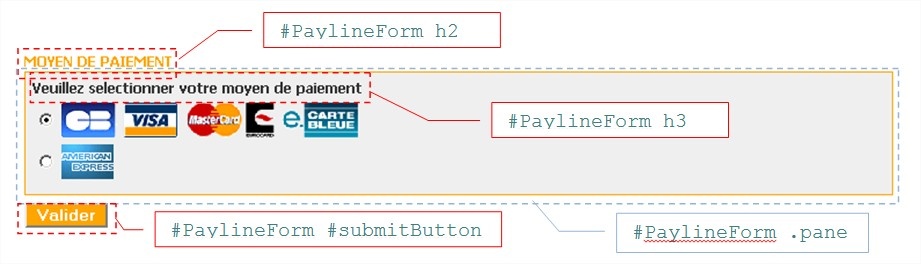
CSS example of the payment web pages |
/ *** Title form (eg "AVERAGE PAYMENT") *** /
#PaylineForm h2 {
}
/ *** Form block *** /
#PaylineForm .pane {
}
/ *** Title form section (eg "Please select your payment method") *** /
#PaylineForm h3 {
}
/ *** Validation button (eg "Validate") *** /
#PaylineForm #submitButton {
} |
Choice page of payment method with virtual wallet
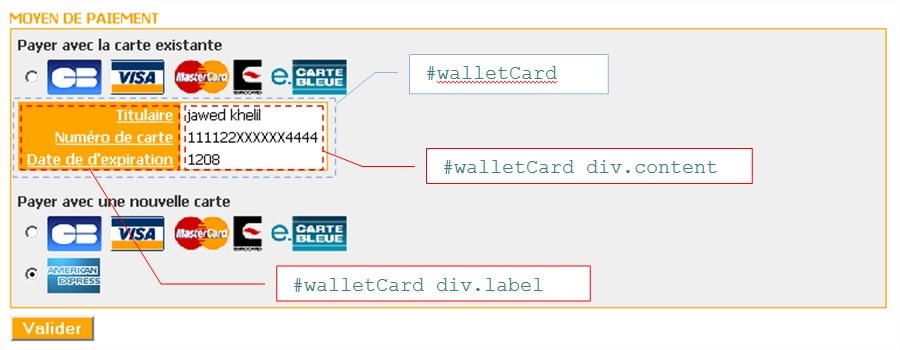
CSS example of the payment web pages |
/ *** Wallet Data Table, *** /
#walletCard {
}
/ *** Wallet Data Table, Header Cells (eg "Owner") *** /
#walletCard div.label {
}
/ *** Portfolio data table, data cells (eg "111122XXXXXX4444") *** /
#walletCard div.content {
} |
Payment Data Entry Page
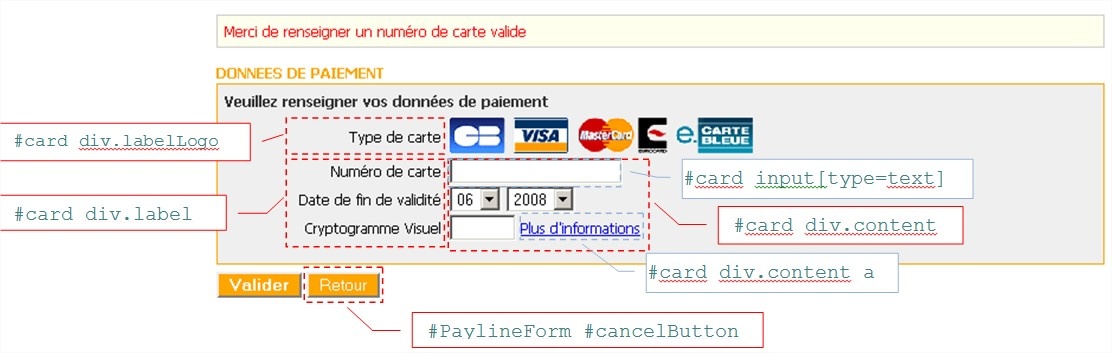
CSS example of the payment web pages |
/ *** Cancel button (eg "Back") *** /
#PaylineForm #cancelButton {
}
/ *** Entry form: "Card Type" header cells *** /
#card div.labelLogo {
}
/ *** Entry Form: Form
Field Labels (eg "Card Number") *** / #card div.label {
}
/ *** Entry Form: Form Field Cells *** /
#card div.content {
}
/ *** input form: form fields (eg card number) *** /
#card input [type = text] {
}
/ *** input form : link (eg "More information") *** /
#card div.content a {
} |
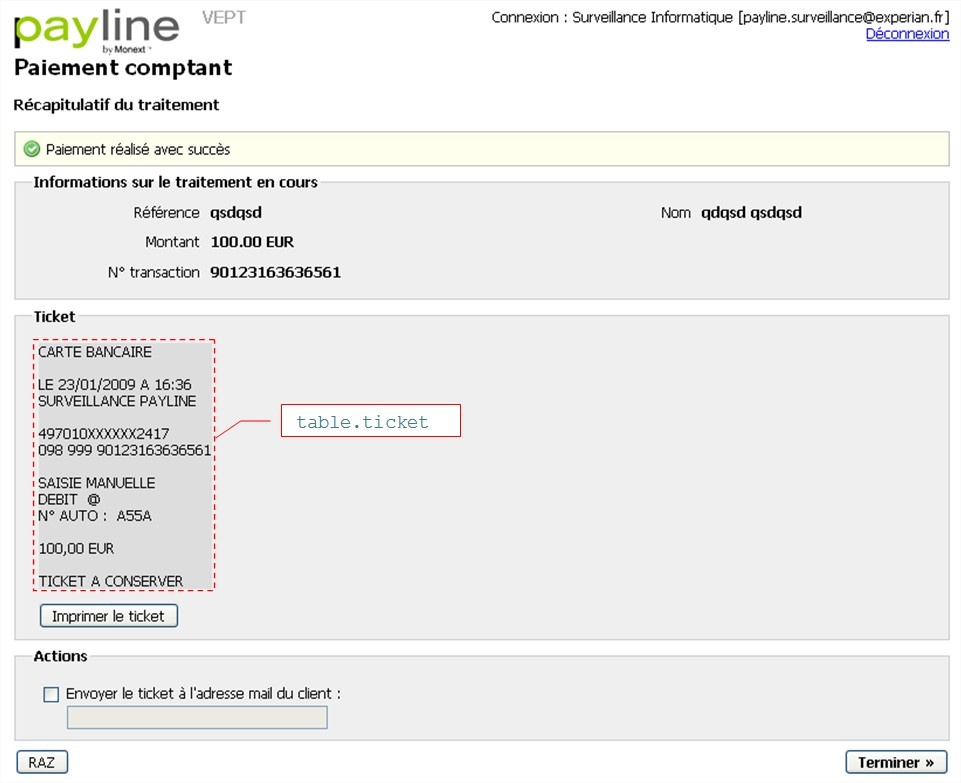
Payment result page
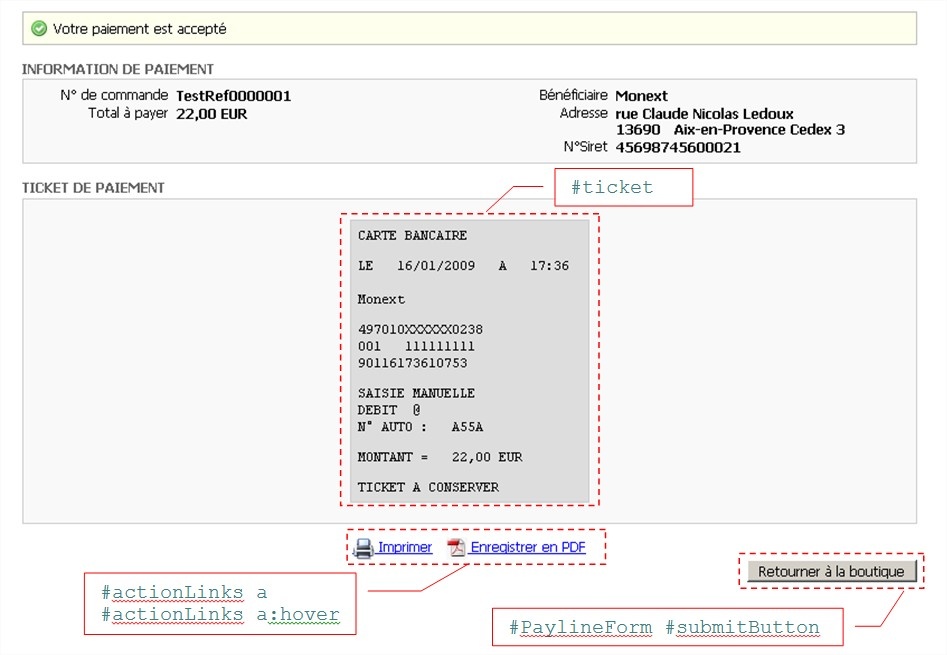
CSS example of the payment web pages |
/ *** Font and ticket size *** /
#ticket {
}
/ *** Back button *** /
#PaylineForm #submitButton {
}
/ *** Footnotes *** /
#actionLinks a {
}
#actionLinks a: hover {
} |
Payment result page with schedule
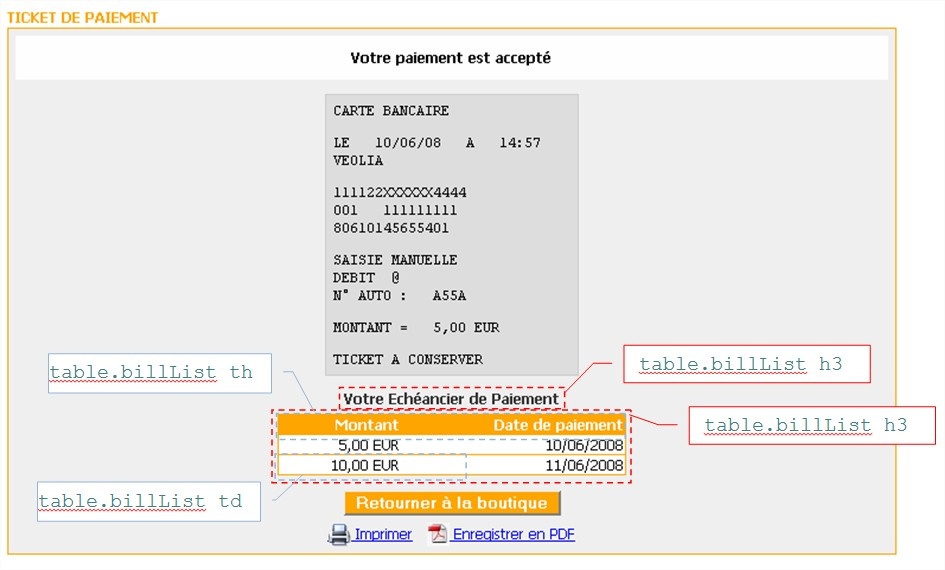
CSS example of the payment web pages |
/ ***
Schedule Title *** / table.billList h3 {
}
/ ***
Schedule *** / table.billList {
}
/ ***
Schedule Headers *** / table.billList th {
}
/ * **
Schedule Cells *** / table.billList td {
} |
Personalization of the TPEV CSS
This section aims to show the main styles to customize the pages of the TPEV.
The CSS supplements web payment pages is available at: https://homologation-tpv.payline.com/tpev/themes/basic/all.css
Home page
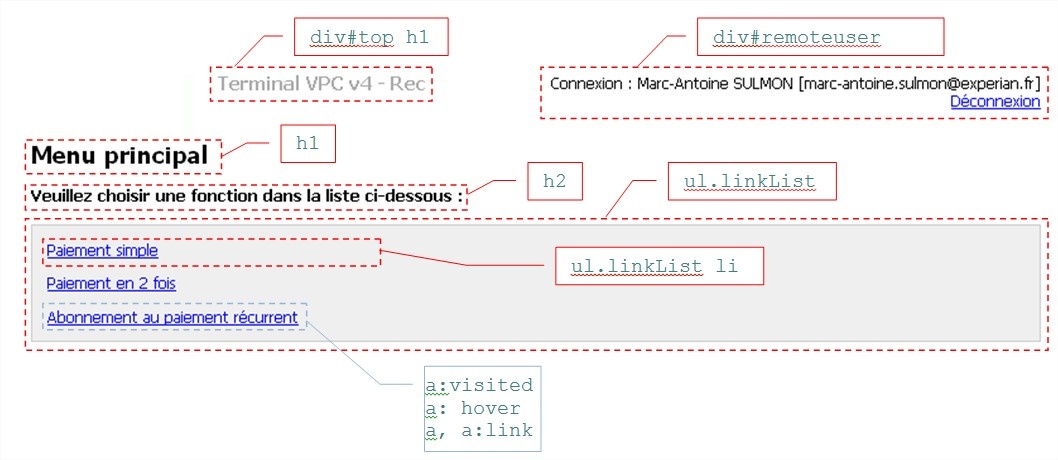
CSS sample of the TPEV |
div#remoteuser {
float: right;
text-align: right;
}
div#top h1 {
color: #AAAAAA;
font-size: 1.2em;
font-weight: bold;
margin-top: 0;
width: 60%;
}
h1 {
color:black;
font-size:1.6em;
line-height:1em !important;
margin:0;
padding:0;
}
h2 {
font-size:1.1em;
margin:1.1em 0;
}
ul.linkList {
background:#EFEFEF none repeat scroll 0 0;
border:1px solid #CCCCCC;
margin:0;
padding:1em 1em 0;
}
ul.linkList li {
margin:0;
padding-bottom:1em;
}
a:visited {
}
a:hover {
text-decoration:none;
}
a, a:link {
color:blue;
text-decoration:underline;
}
/*** reglages generaux (police, couleur…) ***/
body {
background:white none repeat scroll 0 0;
color:black;
font-family:Tahoma,sans-serif !important;
font-size:76%;
margin-top:0;
} |
Error and confirmation messages
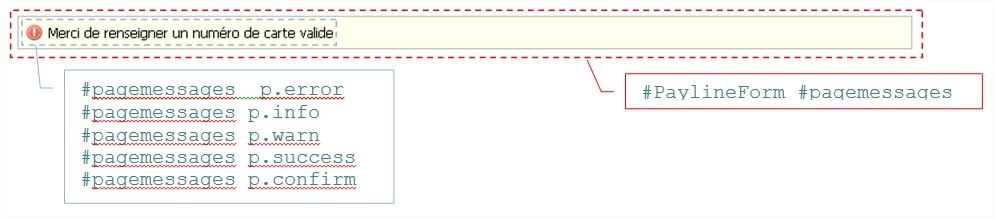

| CSS sample of the TPEV |
#pagemessages {
background: #FFFFEE none repeat scroll 0 0;
border: 1px solid #BBBBBB;
margin: 0.5em 0;
padding: 0.5em;
}
#pagemessages p {
color: black;
line-height: 16px;
margin: 0;
padding-left: 21px;
}
#pagemessages p.error {
background: transparent url(img/exclamation.png) no-repeat scroll 0 0;
}
#pagemessages p.info {
background: transparent url(img/information.png) no-repeat scroll 0 0;
}
#pagemessages p.warn {
background: transparent url(img/error.png) no-repeat scroll 0 0;
}
#pagemessages p.success {
background: transparent url(img/accept.png) no-repeat scroll 0 0;
}
#pagemessages p.confirm {
background: transparent url(img/help.png) no-repeat scroll 0 0;
} |
Entry form
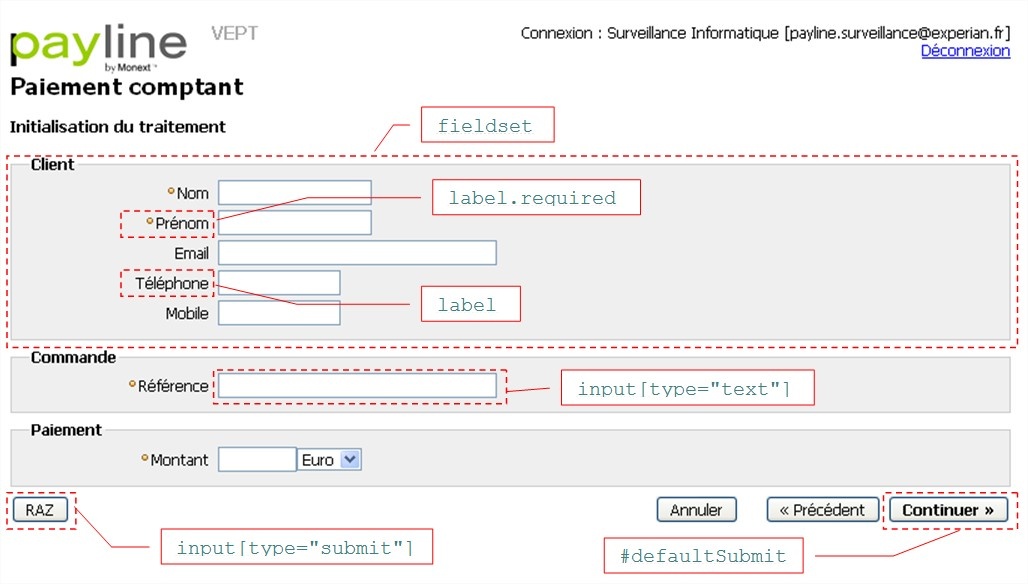
CSS sample of the TPEV |
fieldset {
background: #EFEFEF none repeat scroll 0 0;
border: 1px solid #CCCCCC;
margin: 0.5em 0 0;
}
input[type="text"] {
}
#defaultSubmit {
font-weight: bold;
}
input[type="submit"] {
}
label.required {
background: transparent url(img/required.label.flag.gif) no-repeat
scroll 0 0.25em;
padding-left: 8px;
}
label {
cursor: pointer;
} |
Payment Entry Page with Schedule
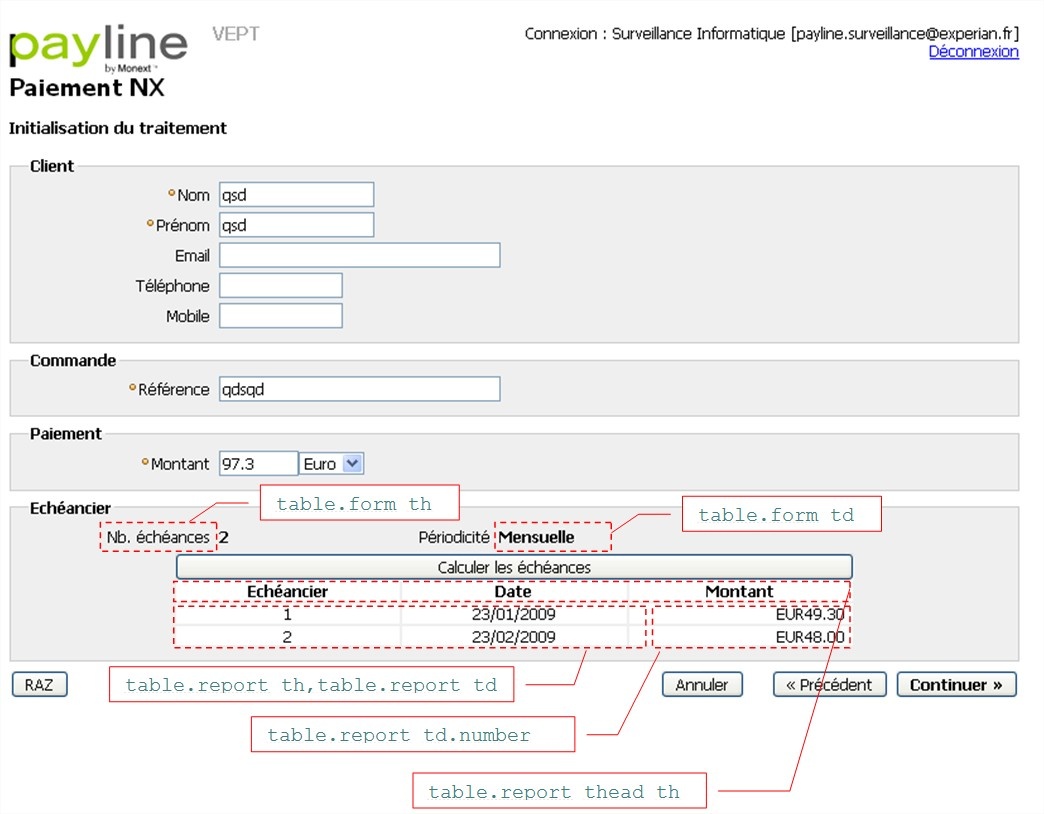
CSS sample of the TPEV |
table.report thead th {
border-top: medium none;
}
table.report td.number {
text-align: right;
}
table.report th,table.report td {
border: 1px solid #EFEFEF;
line-height: 1.3em;
padding: 0 0.5em;
text-align: center;
}
table.form td,table.form th {
line-height: 1.8em;
} |
Payment result page
Verisign Delegation for Certificate Creation
How to customize application images
The images of each can be customized. New images must be provided by the distributor. They must scrupulously respect the following constraints:
- Same name (and identical case)
- Same extension
- Same size in pixel
Images that are not provided will be overwritten with the default images.
The sending procedure is as follows:
- Pack the images into an admin.zip file for admin center images
- Pack the images into a tpev.zip file for TPEV images
- Pack the images into a webp.zip file for the images of the payment web pages
- Send the files to the email address assistance@payline.com the email must include in subject "whitebrand picture" as well as the name of the disrimiter in the body of the email
- The images will be updated on the site at the next update of applications (1 update per month).