
Contents
![]()
![]()
The Widget integration (column / tab or Lightbox mode), takes place in only 3 steps : The minimum HTML page for generating a payment form is as follows: The data-token is the session token for authentication and is obtained in response to the request to initialize a payment (doWebPayment). In order to avoid that a new initialization is performed during each refresh of the page, you must either use a session on your server to store it, or check if the current URL already contains a payment token in a GET parameter named paylinetoken. Here is an example to reuse the token present in the URL: Additional attributes that you can use in the <div> tag allow you to customize the display of the form. For example; if you do not want the payment form to appear automatically when your page is displayed : Function deactivated data-partnerreturnurl The parameter allows you to specify a return url for a defined list of partners, for now: AmazonPay When the buyer clicks on the AmazonPay button, he is redirected to the partner to authenticate. Once authenticated, it is redirected to the specified URL. According to the parameters, here are the examples of integration : Payline forces column page display of payment pages when you use tab mode and the size of the device used by the consumer is too small to display properly. This enhancement simplifies your technical integration when you have a "responsive desktop / mobile" store. To get the form of the payment form formatted, you have to integrate the CSS Payline style sheet by adding the following line in the <head> tag: The URLs of the script and CSS are different between the test and production environments. We recommend that you configure them in environment variables. In order to interact with the payment form, Payline offers a JavaScript API to keep your hand on the form. The available functions of your IS are: Ends the life of the web session token (token obtained via DoWebPayment). Parameters : Returns a complex object containing buyer data from the shortcut partner. This function is available in a context of state = PAYMENT_TRANSITIONAL_SHORTCUT. getCssIframeWhiteList() Returns the list of accepted CSS primitives for stylizing protected fields (Credit Card, CVV, ...) getFragmentedPaymentInfo() In a context of fragmented payment (Carrefour Gift Card, soon ANCV, ...), allows to recover the various payments registered so far. Retrieves a complex object containing: Retrieves the payment schedule. See the integration details: payment N times and recurring payment. To display the schedule N times: getToken() Returns the current token with which the Widget was initialized. init() Request to initialize the payment form. During initialization, the Payline widget builds the form according to the context of the payment request: amount, proposed payment method, etc. Example to hide and then display the payment form: Example to change the label on Pay button: Example to change the label on Pay button: Customizing the style of the payment form is possible by overloading the default style sheet provided by Payline. The possibilities of customization are endless, here are some simple examples: The size of the window is optimized in the following configuration: Below and above the indicated dimensions, it is recommended to adjust the margins and fields. To hide the labels, you must remove the labels and delete the margin to the left of the fields.Integration
<html>
 <head>
   <script src="https://homologation-payment.payline.com/scripts/widget-min.js"></script>
 </head>
 <body>
 <div id="PaylineWidget"
    data-token="the token obtained in doWebPayment Response"
    data-template="column"
    data-embeddedredirectionallowed="false"
 />
 </body>
</html>
<?php $paylineToken = ( is_empty($_GET['paylinetoken']) ) ? createNewWebPayment() : $_GET['paylinetoken']; ?>
Paramètre Description valeur data-template
The name of the template to use for initializing the form. data-auto-init
Defines whether the form should initialize as soon as the web page has finished loading (auto-init to "true"), or if it must wait for an initialization request (auto-init to "false") data-embeddedredirectionallowed
<div id="PaylineWidget"
data-template="shortcut"
data-partnerreturnurl="https://maboutique.com/checkout">InShop Tab mode InShop Column mode LightBox mode Shortcut mode 


Style sheet
<link href="https://homologation-payment.payline.com/styles/widget-min.css" rel="stylesheet" />
JavaScript API
Function Description Example endToken()
( additionnalData : any,
callback : Function,
spinner : any,
handledByMerchant : boolean )finalizeShortCut() Triggers the finalization of the payment ShortCut (to call in context.state PAYMENT_TRANSITIONAL_SHORTCUT) getBuyerShortCut() getCancelAndReturnUrls() Returns a complex object containing the returnUrl and the cancelUrl from the DoWebPayment For example, you can create a cancel button that triggers the following actions:
getContextInfo(key) Returns a context information with its key from the following values: getCssIframeWhiteList(): any
getLanguage() Return the widget's language key (passed in the DoWebPayment frame) "en", "fr", … getOrderInfos() getRecurringDetails() To retrieve recurring payment details:
getToken()
hide() Request to hide the payment form. Payline.Api.hide(): void
isSandBox() Allows to know the environment: production or homologation. The function returns true or false. Payline.Api.isSandbox();
reset() Totally reset the widget with the token and template passed as parameter. show() Request to display the payment form. Payline.Api.show(): void
toggle() If the widget is displayed, this method hides it, otherwise it displays it. updateWebpaymentData() Update of the payment session information (addresses, amount, ...) after the initialization of the widget and before the finalization of the payment. ![]() Warning, always use the classes for these instructions, never the id of the element that is generated on the fly
Warning, always use the classes for these instructions, never the id of the element that is generated on the flyCSS customization
Description Paramètre The color of the banner Sign #PaylineWidget .pl-header-title-wrapper { background-color: #ABCDEF; }The color of the sign's text #PaylineWidget .pl-header-title-content h4 { color: #ABCDEF; }The color of the text of the amount to be paid #PaylineWidget .pl-header-title-content p { color: #ABCDEF; }The color of the payment button #PaylineWidget .pl-pay-btn { background-color: #ABCDEF; }
#PaylineWidget .pl-pay-btn:hover { background-color: #ABCDEF; }The background color of the form #PaylineWidget .pl-body { background-color: #ABCDEF; }The color of the area of payment #PaylineWidget .pl-pmContainer {
background-color: #ABCDEF;
border-color: #ABCDEF; }The color of the button close the lightbox #PaylineWidget .pl-icon-close { color: #ABCDEF; }.PaylineWidget.pl-container-default .pl-pmContainer .pl-label-input
{ display: none;}
.PaylineWidget.pl-container-default .pl-pmContainer .pl-input-group-container
{ margin-left: 0; }Payline proposes to reduce the margins in order to adjust the window above 900px wide, for that it is enough to decrease the width of the label (xx%), and to decrease the margin to the left of the fields (yy% by default 30% ). .PaylineWidget.pl-container-default .pl-pmContainer .pl-label-input
{ width: xx%; }
.PaylineWidget.pl-container-default .pl-pmContainer .pl-input-group-container,
.PaylineWidget.pl-container-default .pl-form-container label.pl-remember-container
{ margin-lef: yy%; }Life cycle callback
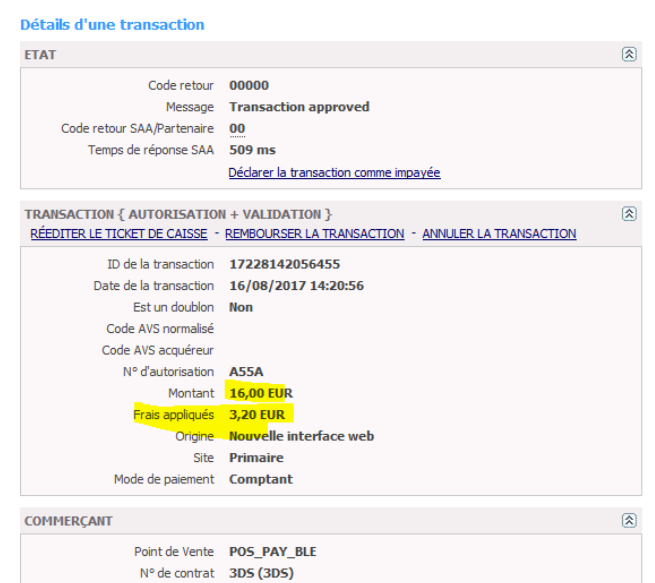
Features Fee Management
The expense management is present on the payment form and corresponds to the Transaction insert:
| Back office : Configure the payment method | Back office : transaction details | Payment page |
|---|---|---|
|  |
|


Fee management excludes in the following cases:
- Wallet Payment
- ShortCut Payment
- Payment Rec / NX